> ## Documentation Index
> Fetch the complete documentation index at: https://docs.mykit.info/llms.txt
> Use this file to discover all available pages before exploring further.
# Armory
> Track firearms, accessories, components, and cleaning supplies in your organization's inventory.
## Overview
The Armory module manages your organization's serialized weapons and everything that goes with them. It is split into four tabs: **Firearms**, **Accessories**, **Components**, and **Cleaning**. All items are scoped to your organization and visible only to your team.
***
## Customizing visible fields
Armory tracks a lot of optional data — purchase price, cleaning schedules, ballistic data, battery tracking, optic specs, and more — but most people only use a handful of these fields at a time. Every user can choose which fields they personally want to see, without ever deleting any data underneath.
### First-time setup
The first time you open Armory, you'll see a short questionnaire — "Do you handload your own ammunition?", "Do you track cleaning schedules?", and similar. Answer **Yes**/**No** per topic, or **Skip for now**. If your organization already has data in a given area (for example, purchase prices are already saved on existing firearms), that topic is detected automatically and marked visible without being asked about.
### How hiding works
* **Add/Edit forms** — hidden fields simply don't appear. If every field in a section is hidden, that section's tab disappears from the form entirely.
* **Detail view** — a hidden field with no saved data just doesn't show. If you previously entered data for a field you've since hidden, it isn't deleted — it's tucked behind a **Show hidden fields with saved data** toggle at the bottom of the detail panel, one click away.
### Changing your preferences later
Go to **Profile → Armory Fields** (`/dashboard/settings/armory-fields`) to review and adjust exactly which fields are visible, grouped by category, separately for Firearms, Accessories, and Components. The same page has a **Re-run Setup Questionnaire** button if you'd like to go through the first-time questions again — useful after your tracking habits change.
***
## Firearms tab
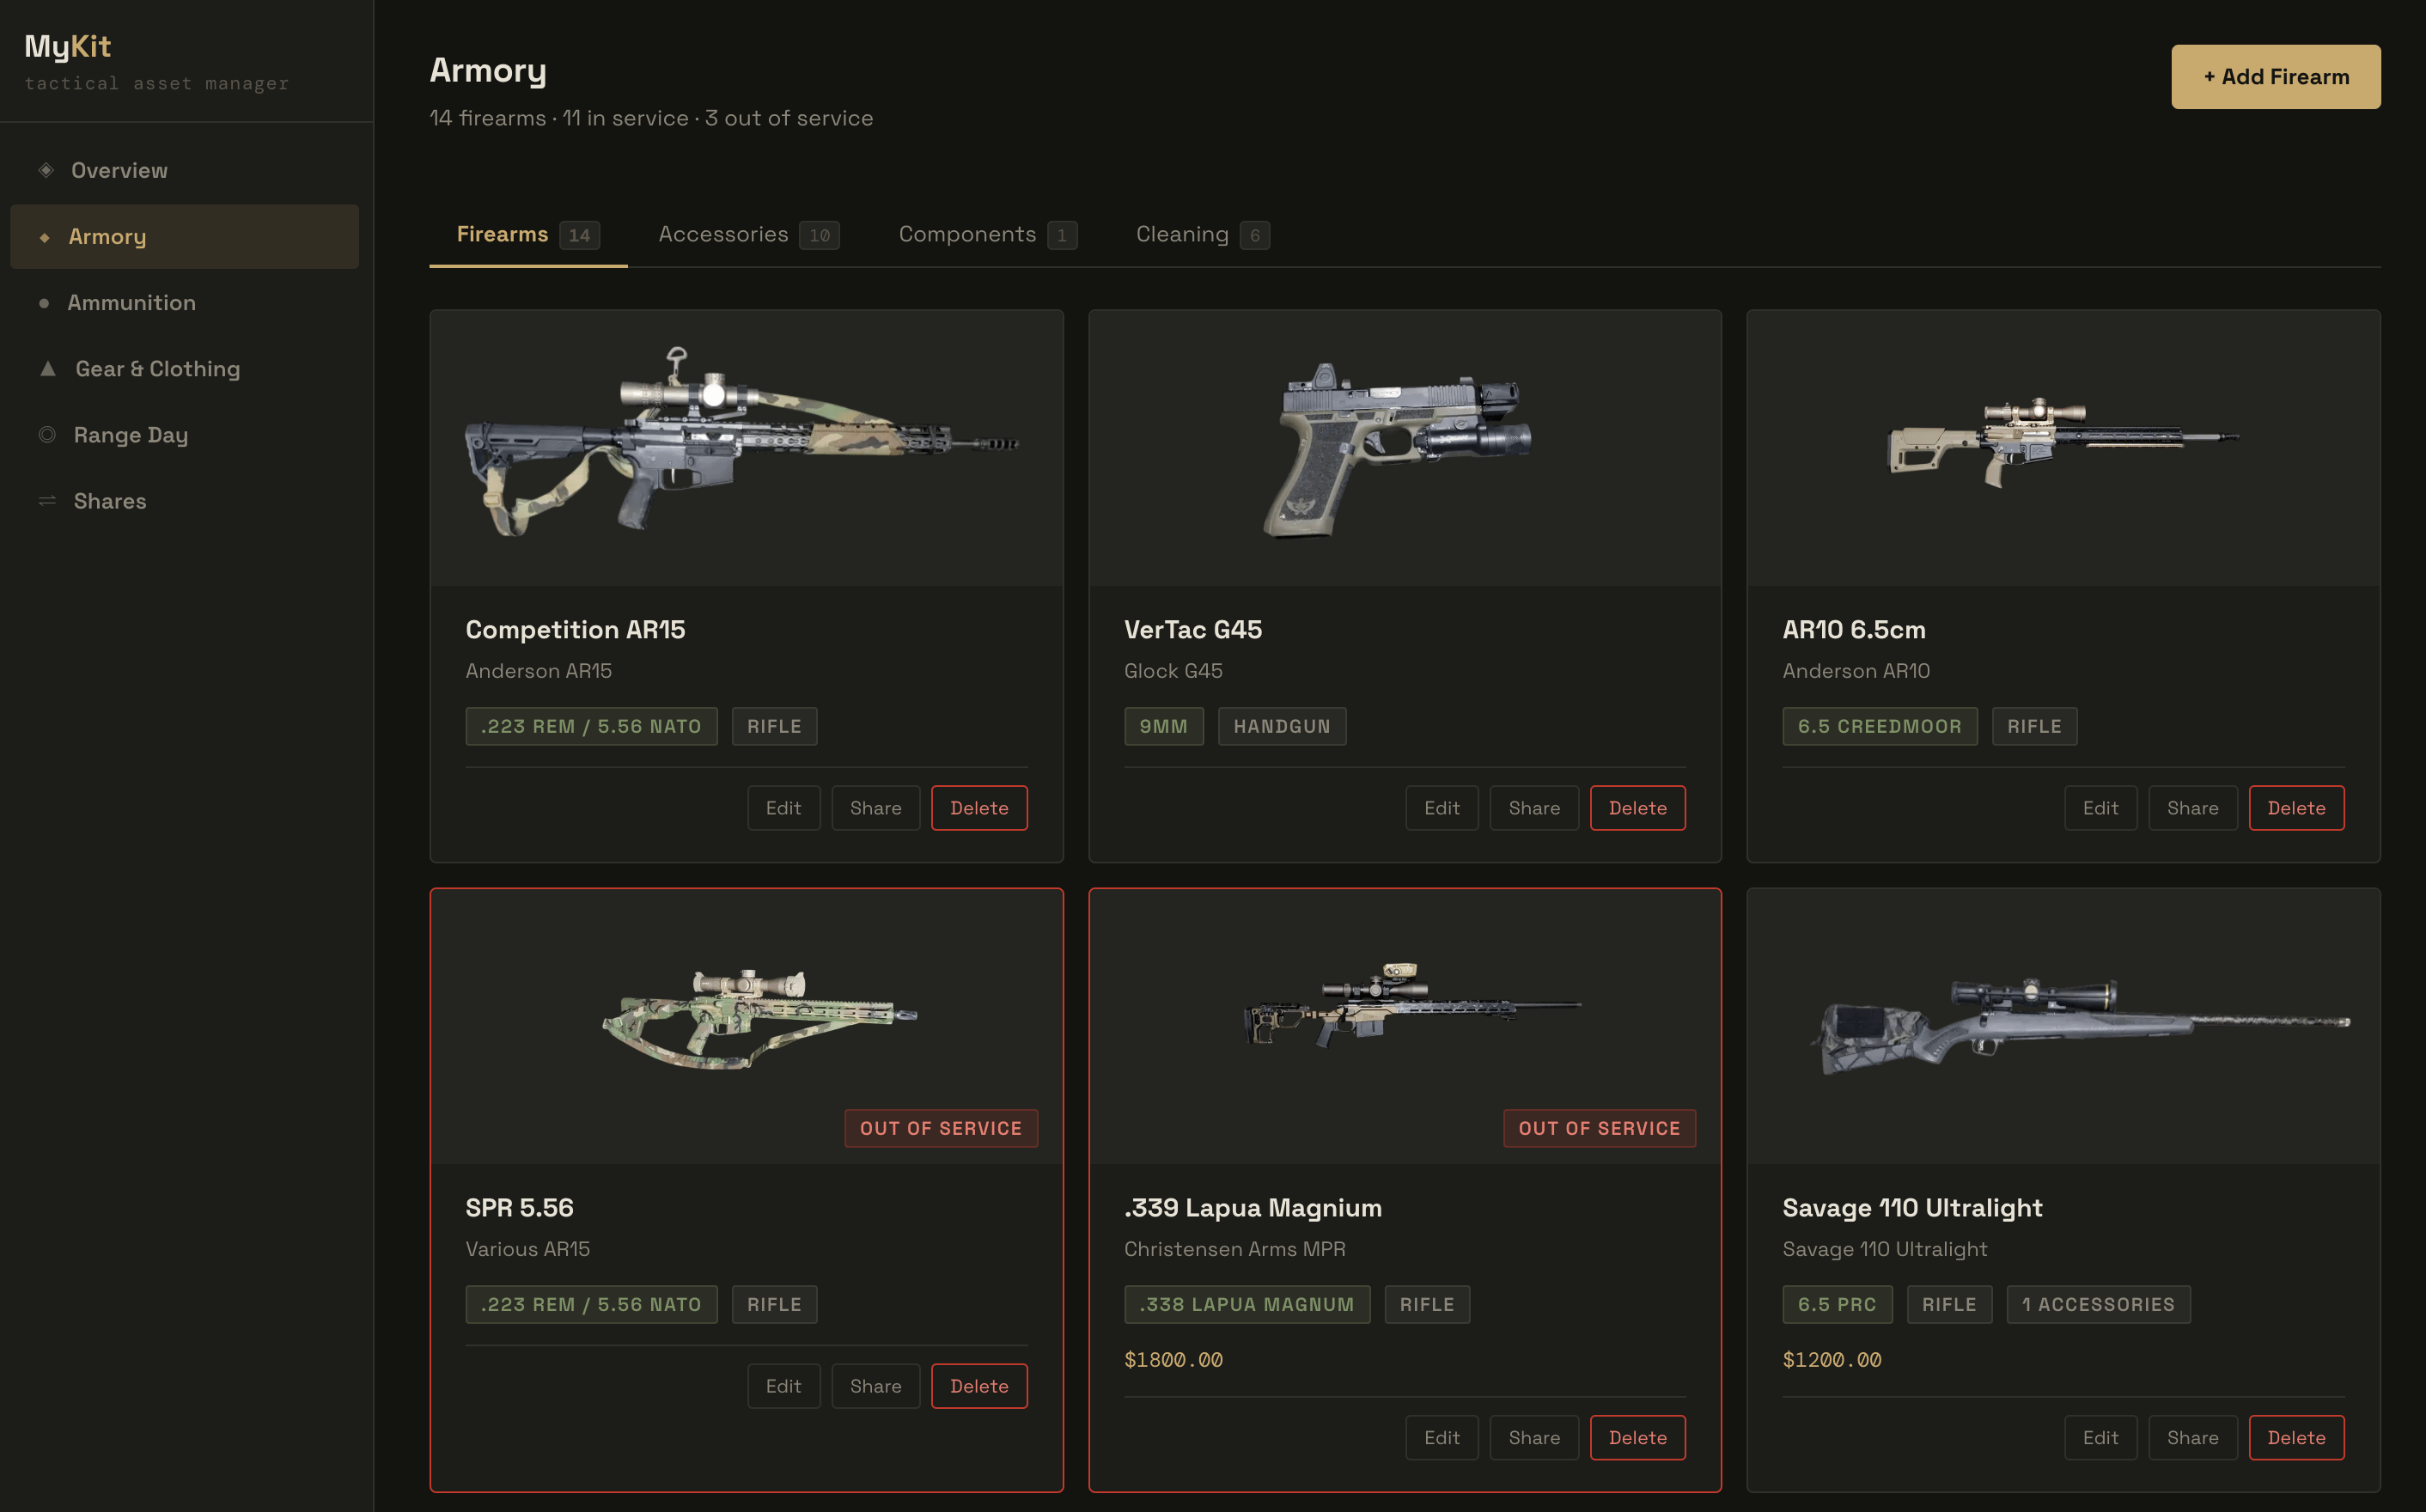
The Firearms tab is the default view. It lists every firearm in your inventory along with its in-service status, caliber, round count, and any cleaning alerts.
 ### Adding a firearm
1. Navigate to **Armory** in the left sidebar.
2. Click **+ Add Firearm** in the upper right.
3. Fill in make, model, caliber, and serial number.
4. Optionally set a custom name, purchase price, weight, notes, or attach a photo.
5. Save — the firearm appears in the Firearms list immediately.
### In-service status
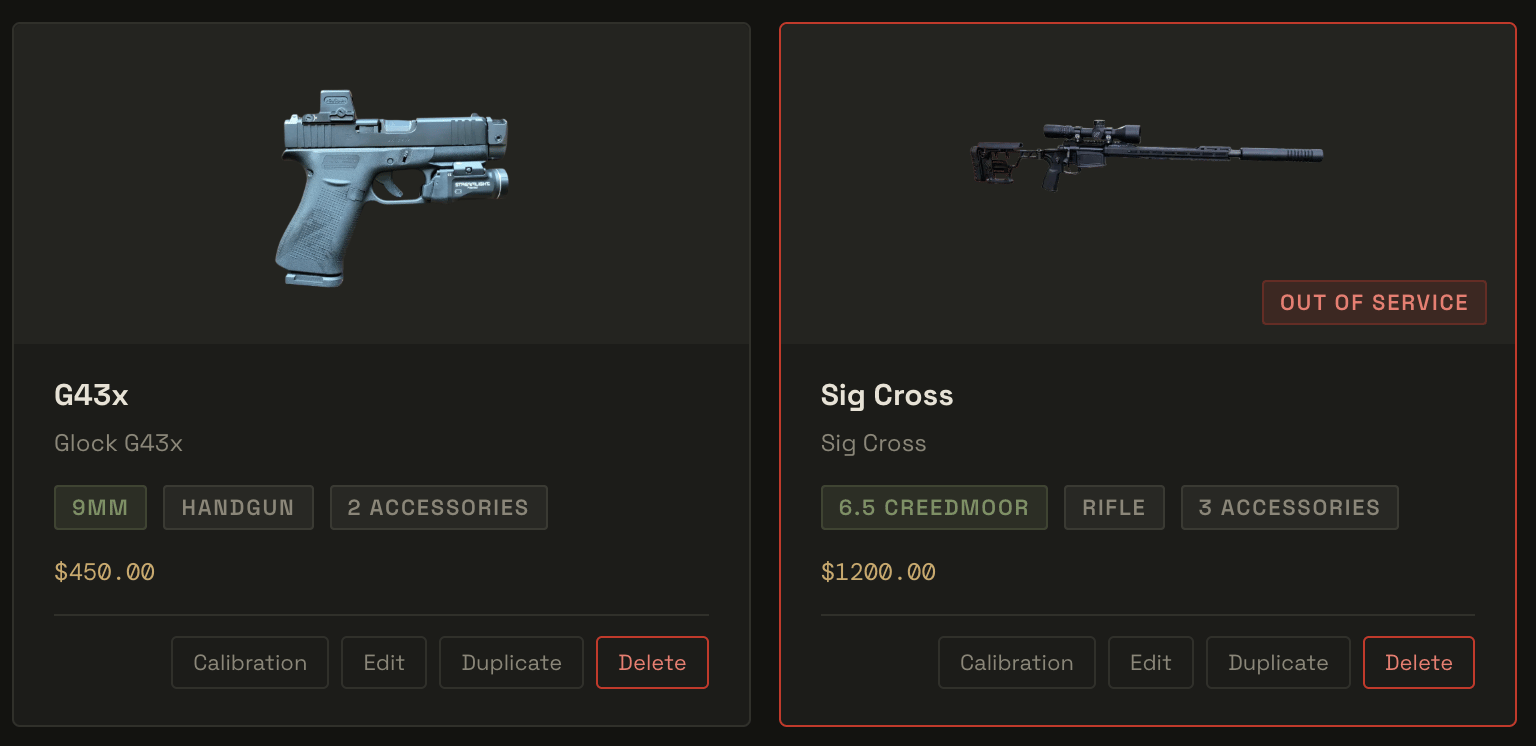
Each firearm can be marked **In Service** or **Out of Service**. The header subtitle tracks the count of each. Out-of-service firearms remain in the list but are visually distinguished.
### Adding a firearm
1. Navigate to **Armory** in the left sidebar.
2. Click **+ Add Firearm** in the upper right.
3. Fill in make, model, caliber, and serial number.
4. Optionally set a custom name, purchase price, weight, notes, or attach a photo.
5. Save — the firearm appears in the Firearms list immediately.
### In-service status
Each firearm can be marked **In Service** or **Out of Service**. The header subtitle tracks the count of each. Out-of-service firearms remain in the list but are visually distinguished.
 ### Wish list
Toggle **Wish List** on a firearm to mark it as a planned purchase rather than owned inventory. Wish-list items display with a dashed blue border and a **Wish List** badge. Use the wish-list filter at the top of the list to show all items, owned only, or wish-list only.
### Firearm detail page
Click a firearm card, then click **View Details** to open the full detail page.
### Wish list
Toggle **Wish List** on a firearm to mark it as a planned purchase rather than owned inventory. Wish-list items display with a dashed blue border and a **Wish List** badge. Use the wish-list filter at the top of the list to show all items, owned only, or wish-list only.
### Firearm detail page
Click a firearm card, then click **View Details** to open the full detail page.
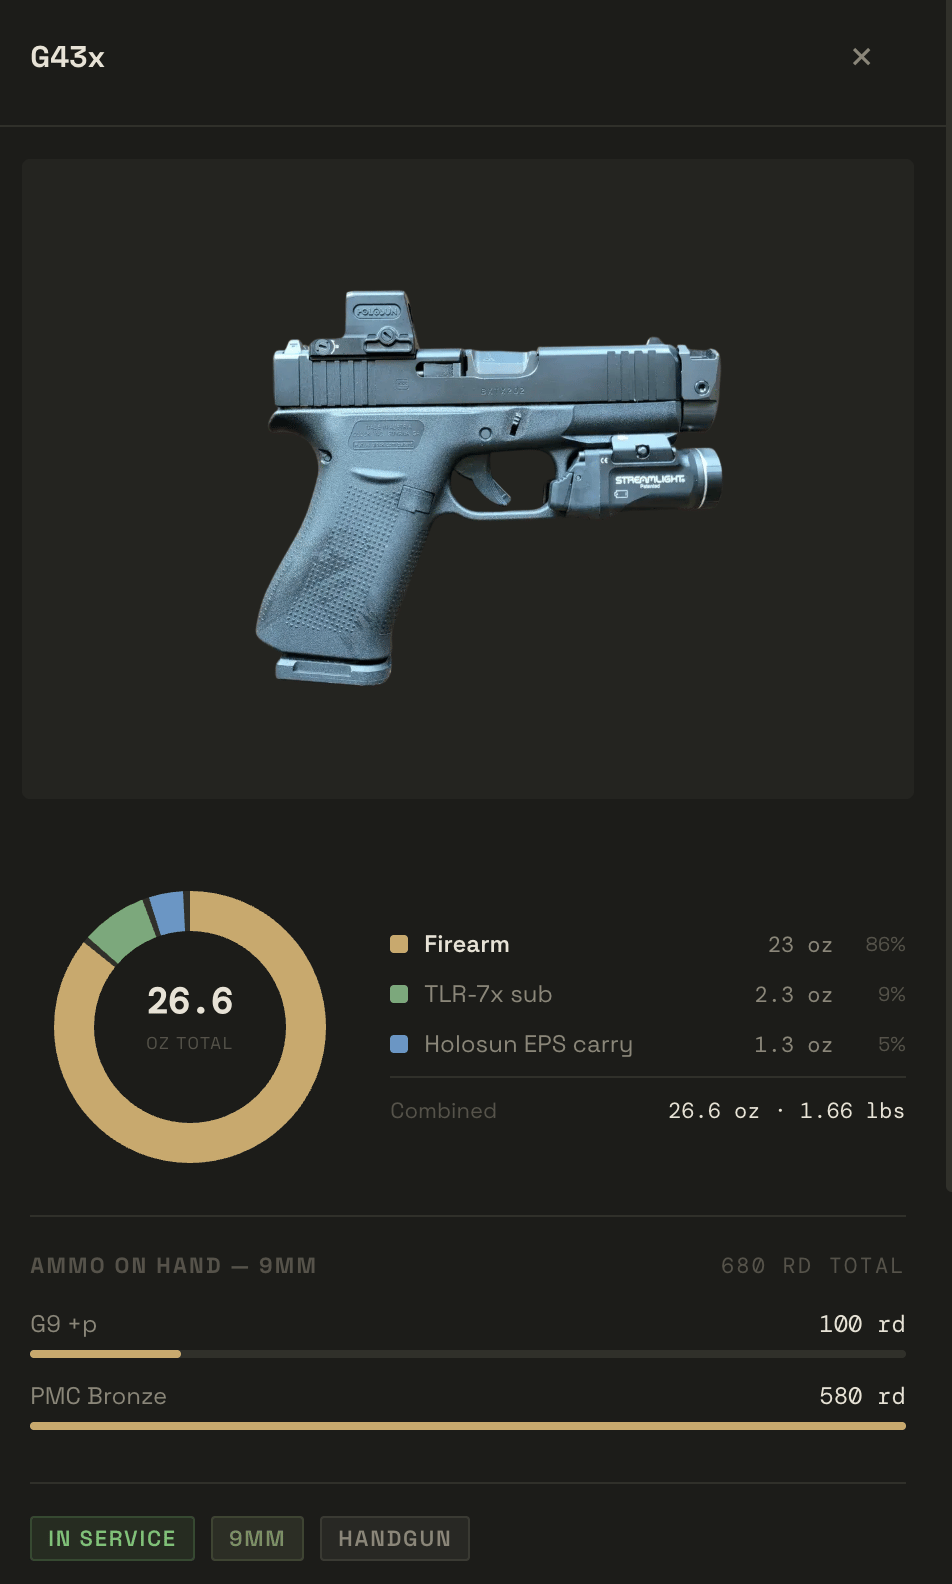 The top of the detail page shows:
* **Photo** — the firearm image if one was attached.
* **Weight donut chart** — total combined weight of the firearm and all attached accessories, broken out by item.
* **Ammo on hand** — a summary of linked ammo rounds by lot, with round counts.
* **Status badges** — in-service status, caliber, and firearm type at a glance.
The top of the detail page shows:
* **Photo** — the firearm image if one was attached.
* **Weight donut chart** — total combined weight of the firearm and all attached accessories, broken out by item.
* **Ammo on hand** — a summary of linked ammo rounds by lot, with round counts.
* **Status badges** — in-service status, caliber, and firearm type at a glance.
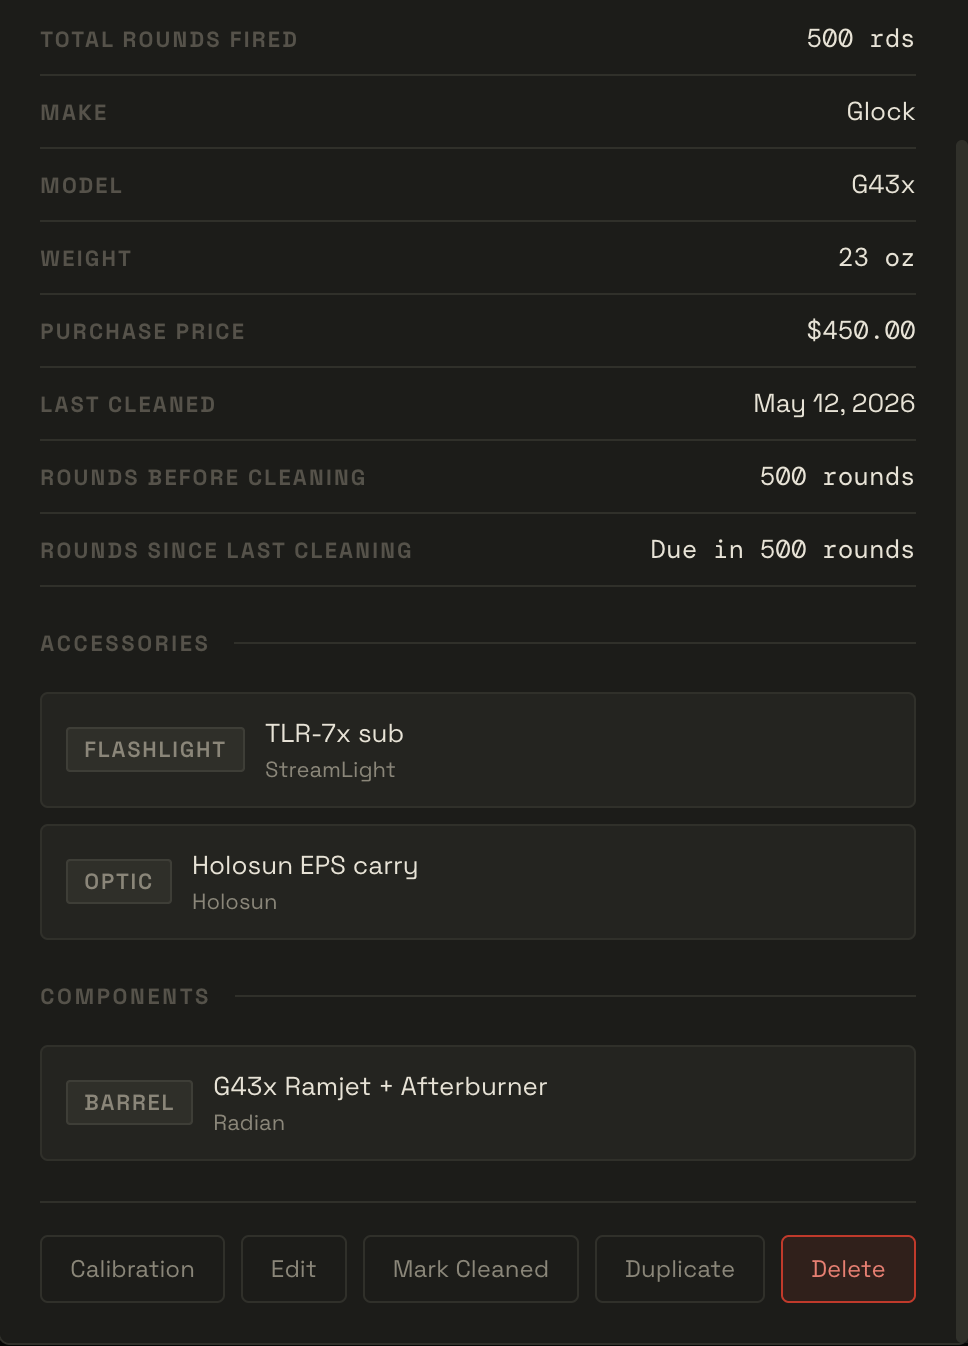 The lower section shows all stored fields plus:
* **Cleaning schedule** — tracks total rounds fired, the last-cleaned date, the round interval before the next cleaning is due, and how many rounds remain until the firearm is overdue. Use **Mark Cleaned** from the detail page to reset the counter after a cleaning session.
* **Attached accessories** — all accessories currently assigned to this firearm, listed by type and name.
* **Installed components** — components toggled as installed on this firearm.
* **Watch calibration** — if a Garmin watch is paired, this section lets you calibrate shot detection thresholds against this specific firearm. See [Watch Calibration](/watch/overview#calibration) for the full workflow.
***
## Accessories tab
Accessories are tracked as standalone items and can optionally be assigned to a specific firearm.
The lower section shows all stored fields plus:
* **Cleaning schedule** — tracks total rounds fired, the last-cleaned date, the round interval before the next cleaning is due, and how many rounds remain until the firearm is overdue. Use **Mark Cleaned** from the detail page to reset the counter after a cleaning session.
* **Attached accessories** — all accessories currently assigned to this firearm, listed by type and name.
* **Installed components** — components toggled as installed on this firearm.
* **Watch calibration** — if a Garmin watch is paired, this section lets you calibrate shot detection thresholds against this specific firearm. See [Watch Calibration](/watch/overview#calibration) for the full workflow.
***
## Accessories tab
Accessories are tracked as standalone items and can optionally be assigned to a specific firearm.
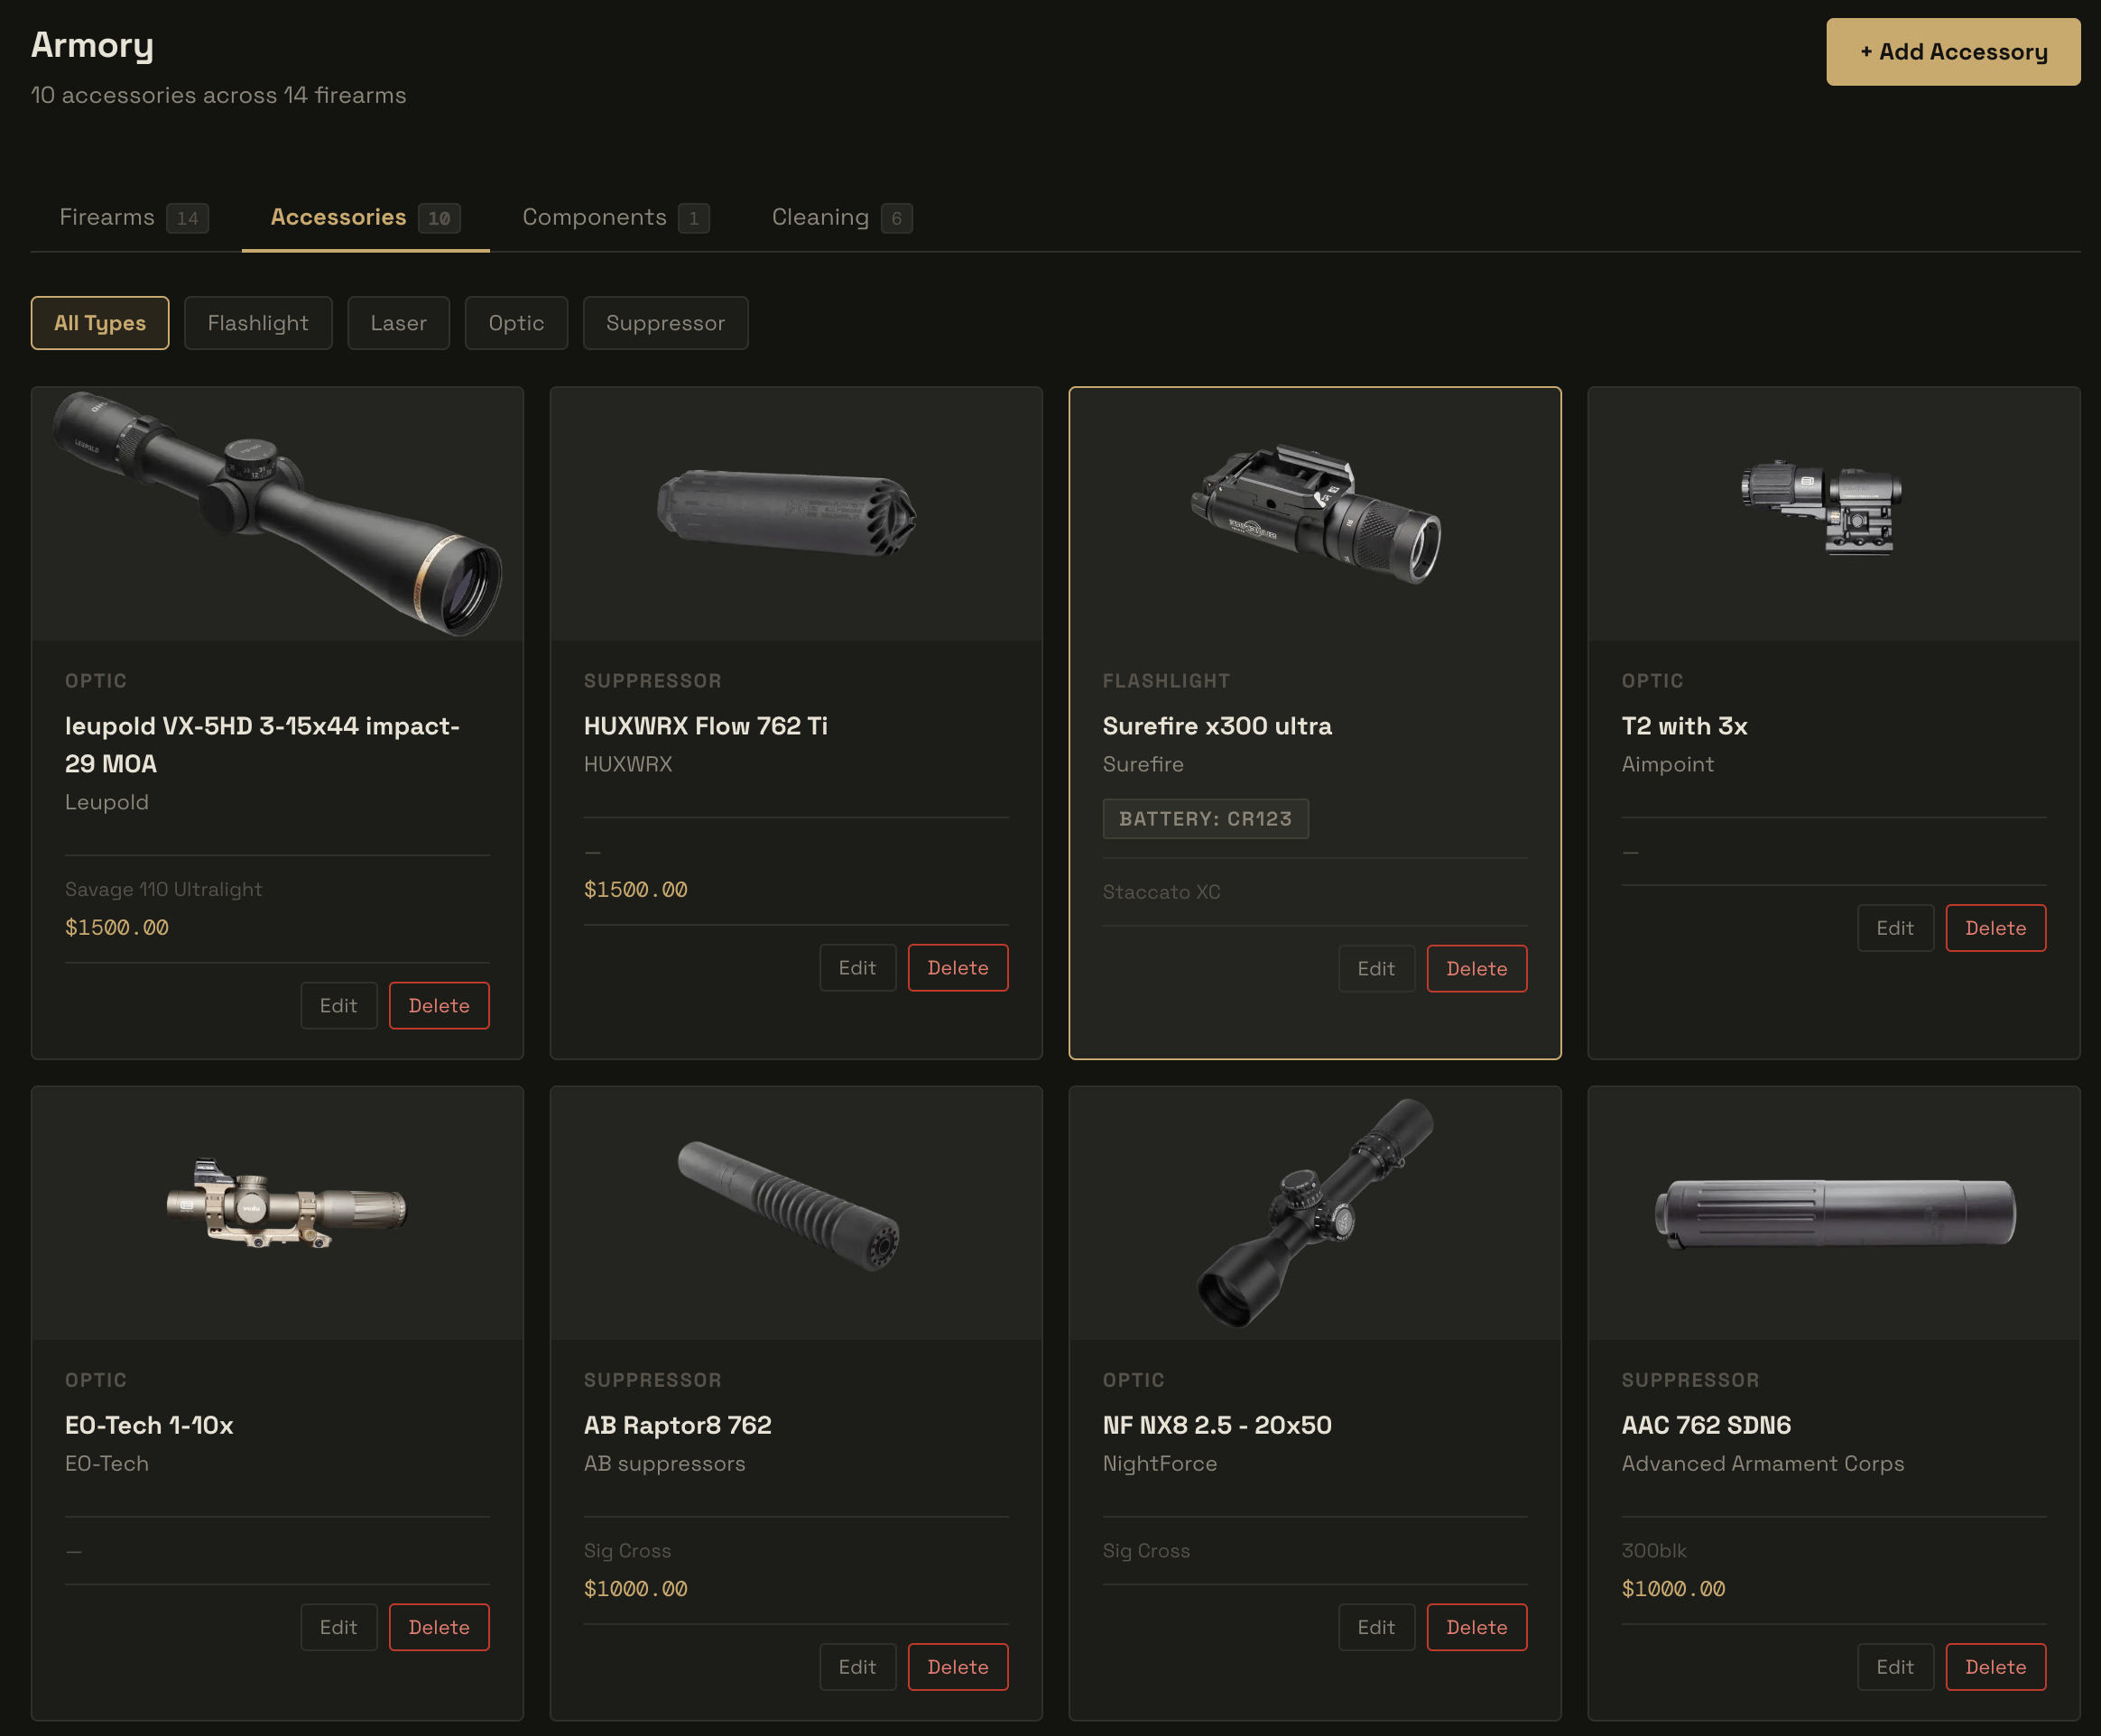 ### Adding an accessory
1. Go to **Armory → Accessories** tab.
2. Click **+ Add Accessory**.
3. Select a **Type** — if you choose **Optic**, additional fields appear (see below).
4. Optionally assign the accessory to a firearm.
5. Enter name, brand, serial number, product URL, purchase price, and weight.
6. Save.
### Optic-specific fields
When **Type** is set to **Optic**, an **Optic Details** section appears with:
| Field | When shown | Options |
| --------------- | -------------- | ------------------------------------------------- |
| Optic Type | Always | Red Dot, Magnified Optic |
| Adjustment Unit | Always | MOA, MRAD (Mil) |
| Focal Plane | Magnified only | First Focal Plane (FFP), Second Focal Plane (SFP) |
| Magnification | Magnified only | Free text, e.g. `1-6x` |
| Reticle | Always | Free text, e.g. `BDC`, `MRAD Grid` |
Focal plane and magnification fields only appear when **Optic Type** is set to **Magnified Optic**.
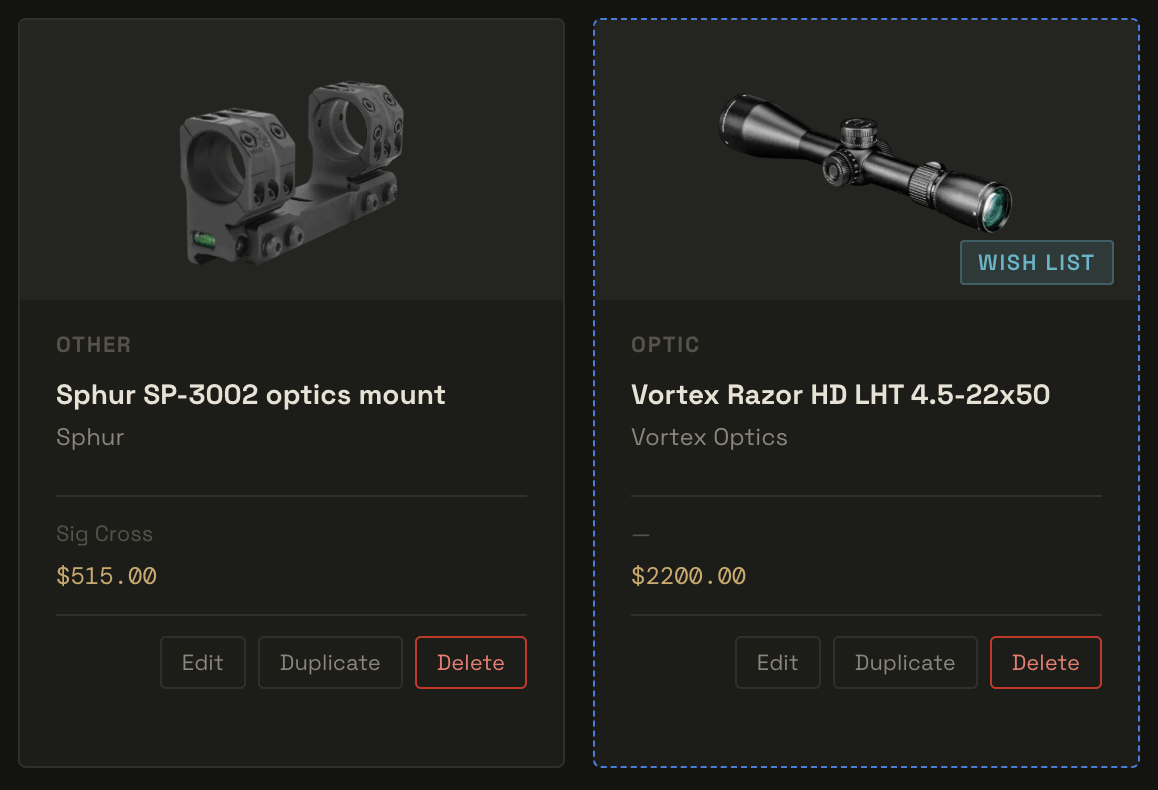
### Wish list
Same as firearms — toggle **Wish List** to mark an accessory as a planned purchase. Wish-list items show with a dashed blue border and are filterable from the filter bar.
### Adding an accessory
1. Go to **Armory → Accessories** tab.
2. Click **+ Add Accessory**.
3. Select a **Type** — if you choose **Optic**, additional fields appear (see below).
4. Optionally assign the accessory to a firearm.
5. Enter name, brand, serial number, product URL, purchase price, and weight.
6. Save.
### Optic-specific fields
When **Type** is set to **Optic**, an **Optic Details** section appears with:
| Field | When shown | Options |
| --------------- | -------------- | ------------------------------------------------- |
| Optic Type | Always | Red Dot, Magnified Optic |
| Adjustment Unit | Always | MOA, MRAD (Mil) |
| Focal Plane | Magnified only | First Focal Plane (FFP), Second Focal Plane (SFP) |
| Magnification | Magnified only | Free text, e.g. `1-6x` |
| Reticle | Always | Free text, e.g. `BDC`, `MRAD Grid` |
Focal plane and magnification fields only appear when **Optic Type** is set to **Magnified Optic**.
### Wish list
Same as firearms — toggle **Wish List** to mark an accessory as a planned purchase. Wish-list items show with a dashed blue border and are filterable from the filter bar.
 ***
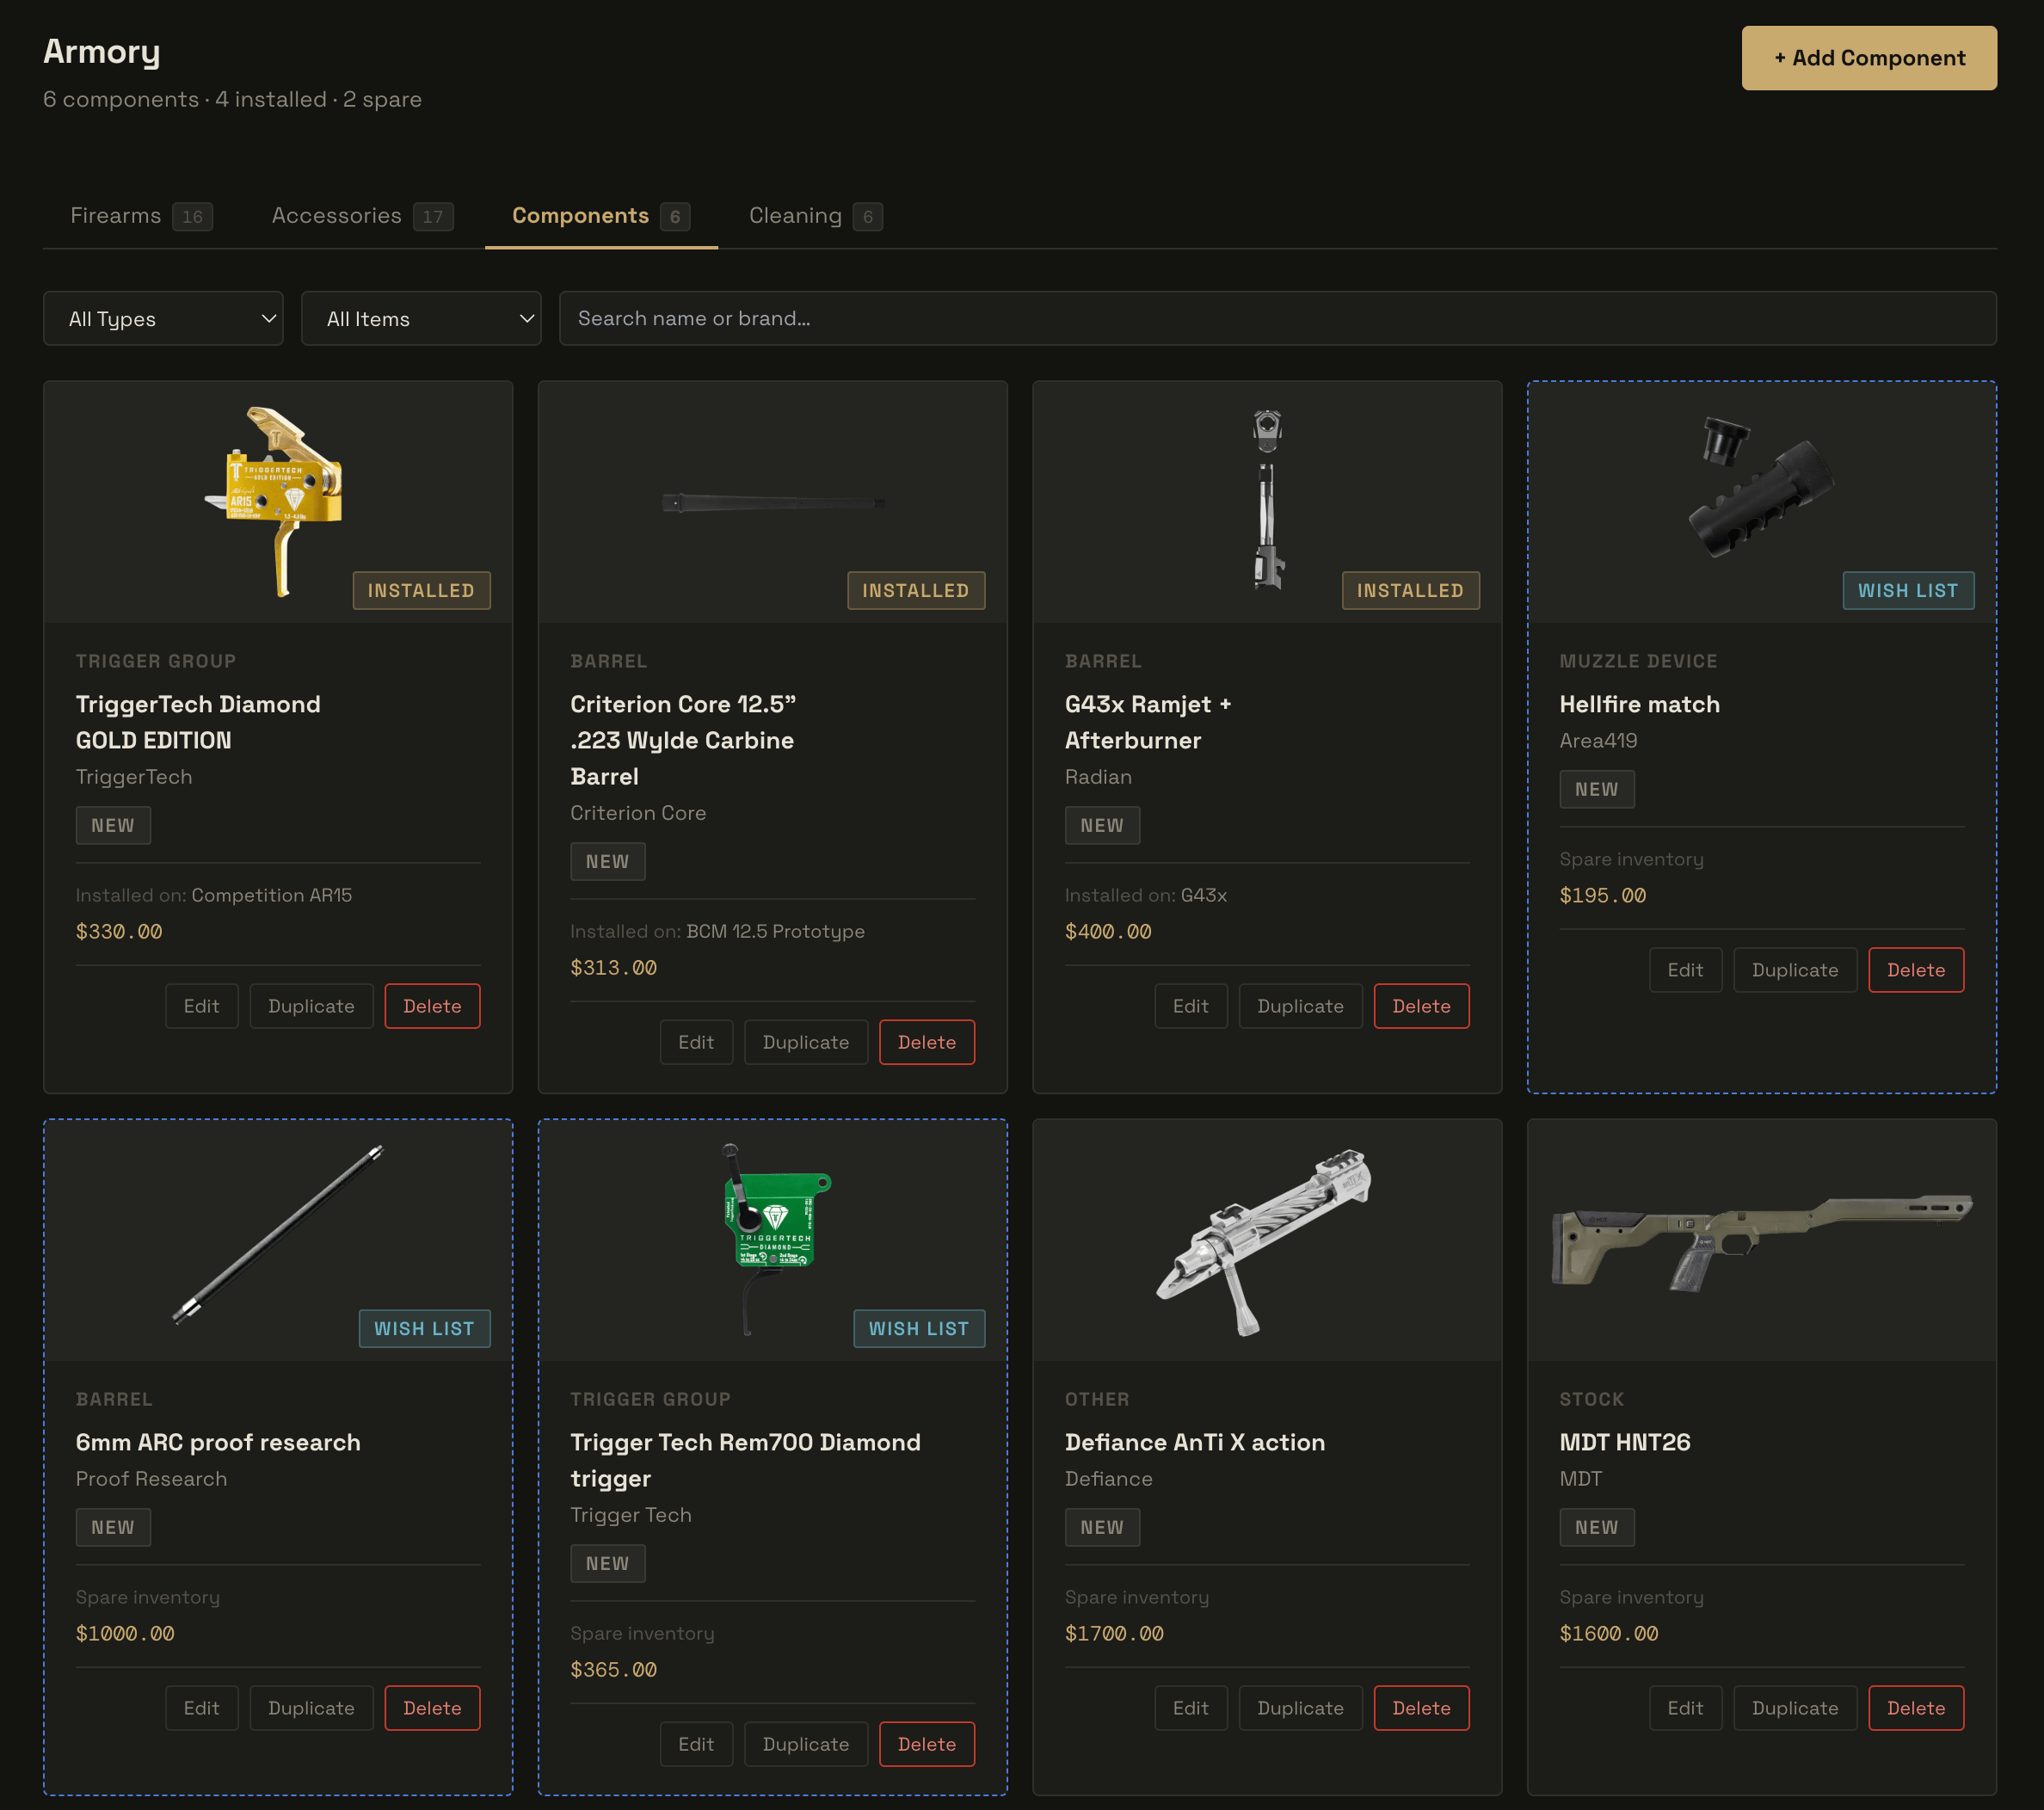
## Components tab
The Components tab tracks internal parts and upgrade components — things like barrels, trigger groups, bolt carrier groups, and springs.
***
## Components tab
The Components tab tracks internal parts and upgrade components — things like barrels, trigger groups, bolt carrier groups, and springs.
 ### Adding a component
1. Go to **Armory → Components** tab.
2. Click **+ Add Component**.
3. Select a type, condition (New / Used / Refurbished), and optionally assign it to a firearm.
4. Toggle **Installed** if the component is currently on the firearm; leave it off if it is spare inventory.
5. Enter name, brand, serial number, purchase price, weight, and any notes.
6. Save.
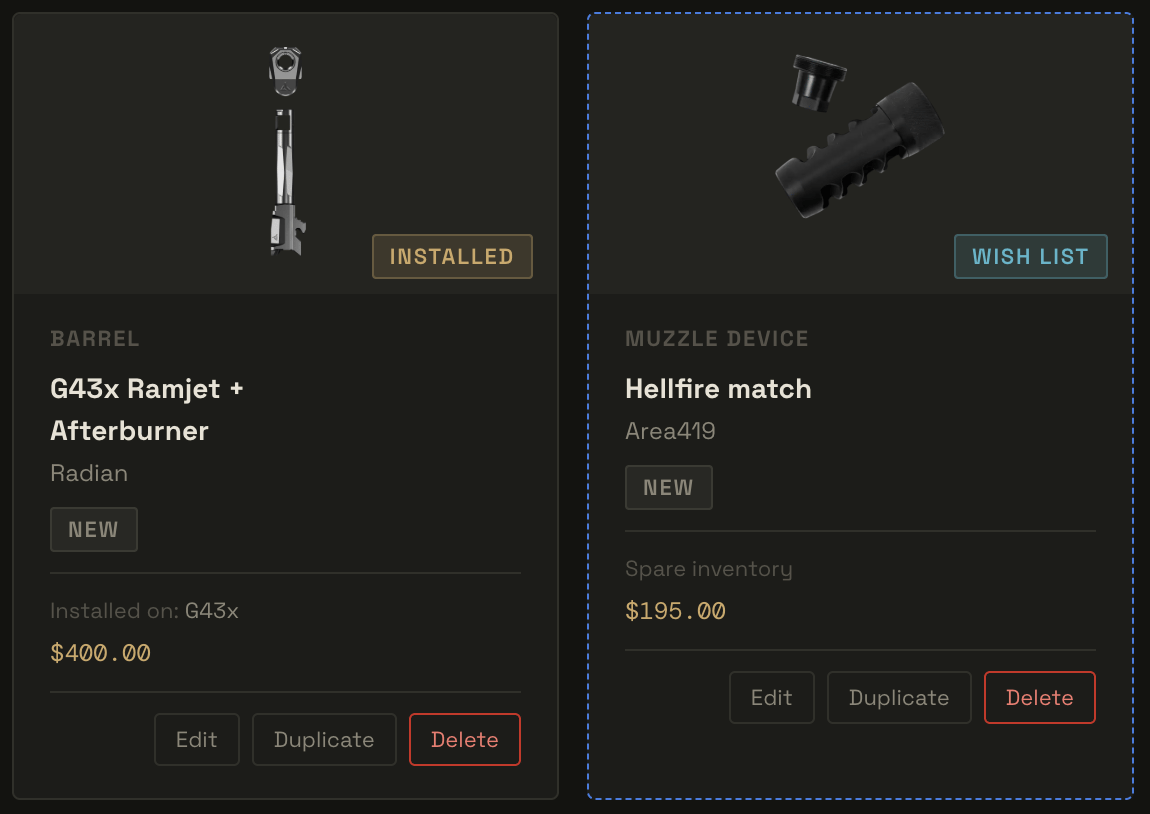
### Installed vs. spare
* **Installed** — component is currently on an assigned firearm. Shown with a gold **Installed** badge.
* **Spare** — component is in inventory, not currently mounted. Shown as "Spare inventory" in the card footer.
The Armory header subtitle reflects the installed/spare split when the Components tab is active.
### Wish list
Toggle **Wish List** to mark a component as a planned purchase. Filtering works the same as on the other tabs.
### Adding a component
1. Go to **Armory → Components** tab.
2. Click **+ Add Component**.
3. Select a type, condition (New / Used / Refurbished), and optionally assign it to a firearm.
4. Toggle **Installed** if the component is currently on the firearm; leave it off if it is spare inventory.
5. Enter name, brand, serial number, purchase price, weight, and any notes.
6. Save.
### Installed vs. spare
* **Installed** — component is currently on an assigned firearm. Shown with a gold **Installed** badge.
* **Spare** — component is in inventory, not currently mounted. Shown as "Spare inventory" in the card footer.
The Armory header subtitle reflects the installed/spare split when the Components tab is active.
### Wish list
Toggle **Wish List** to mark a component as a planned purchase. Filtering works the same as on the other tabs.
 ***
## Cleaning tab
The Cleaning tab is split into two sections: **Cleaning Procedures** and **Cleaning Supplies**.
### Cleaning supplies
Supplies tracks your physical cleaning products. Supply types include:
Solvent / CLP · Lubricant / Oil · Patches · Bore Brush · Cleaning Rod · Bore Snake · Cleaning Cloth · Pick / Tool · Other
Add a supply with **+ Add Supply**. Each supply stores a name, brand, type, quantity, and optional notes.
### Cleaning procedures
Procedures are step-by-step cleaning routines. Each procedure can be linked to a specific firearm and contains an ordered list of steps with notes.
* **+ New Procedure** to create a routine.
* Click a procedure card to view the full step list.
* Use the **Print** button on the detail page to open a printer-friendly version suitable for posting at a cleaning station.
### Cleaning alerts
The Armory tracks rounds fired per firearm and surfaces a cleaning alert when a firearm is overdue based on its assigned procedure's round interval. The alert appears on the firearm card and the firearm detail page. Use **Mark Cleaned** from the firearm card or detail page to reset the counter.
***
## Filtering and search
All four tabs share the same filter bar pattern:
* **Type filter** — narrow by type (caliber on firearms, accessory/component type on their respective tabs, supply type on cleaning).
* **Wish list filter** — show All, Owned only, or Wish List only.
* **Search** — full-text search on name and brand fields.
Results paginate at 20 items per page on the Components tab; other tabs show all matching items.
***
## Cleaning tab
The Cleaning tab is split into two sections: **Cleaning Procedures** and **Cleaning Supplies**.
### Cleaning supplies
Supplies tracks your physical cleaning products. Supply types include:
Solvent / CLP · Lubricant / Oil · Patches · Bore Brush · Cleaning Rod · Bore Snake · Cleaning Cloth · Pick / Tool · Other
Add a supply with **+ Add Supply**. Each supply stores a name, brand, type, quantity, and optional notes.
### Cleaning procedures
Procedures are step-by-step cleaning routines. Each procedure can be linked to a specific firearm and contains an ordered list of steps with notes.
* **+ New Procedure** to create a routine.
* Click a procedure card to view the full step list.
* Use the **Print** button on the detail page to open a printer-friendly version suitable for posting at a cleaning station.
### Cleaning alerts
The Armory tracks rounds fired per firearm and surfaces a cleaning alert when a firearm is overdue based on its assigned procedure's round interval. The alert appears on the firearm card and the firearm detail page. Use **Mark Cleaned** from the firearm card or detail page to reset the counter.
***
## Filtering and search
All four tabs share the same filter bar pattern:
* **Type filter** — narrow by type (caliber on firearms, accessory/component type on their respective tabs, supply type on cleaning).
* **Wish list filter** — show All, Owned only, or Wish List only.
* **Search** — full-text search on name and brand fields.
Results paginate at 20 items per page on the Components tab; other tabs show all matching items.