> ## Documentation Index
> Fetch the complete documentation index at: https://docs.mykit.info/llms.txt
> Use this file to discover all available pages before exploring further.
# Gear & Clothing
> Manage tactical gear, clothing, and named loadouts for your organization.
## Overview
The Gear & Clothing module tracks everything your team carries or wears — plate carriers, holsters, medical kits, uniforms, boots, and more. It is split into two tabs: **Items** and **Loadouts**.
***
## Items tab
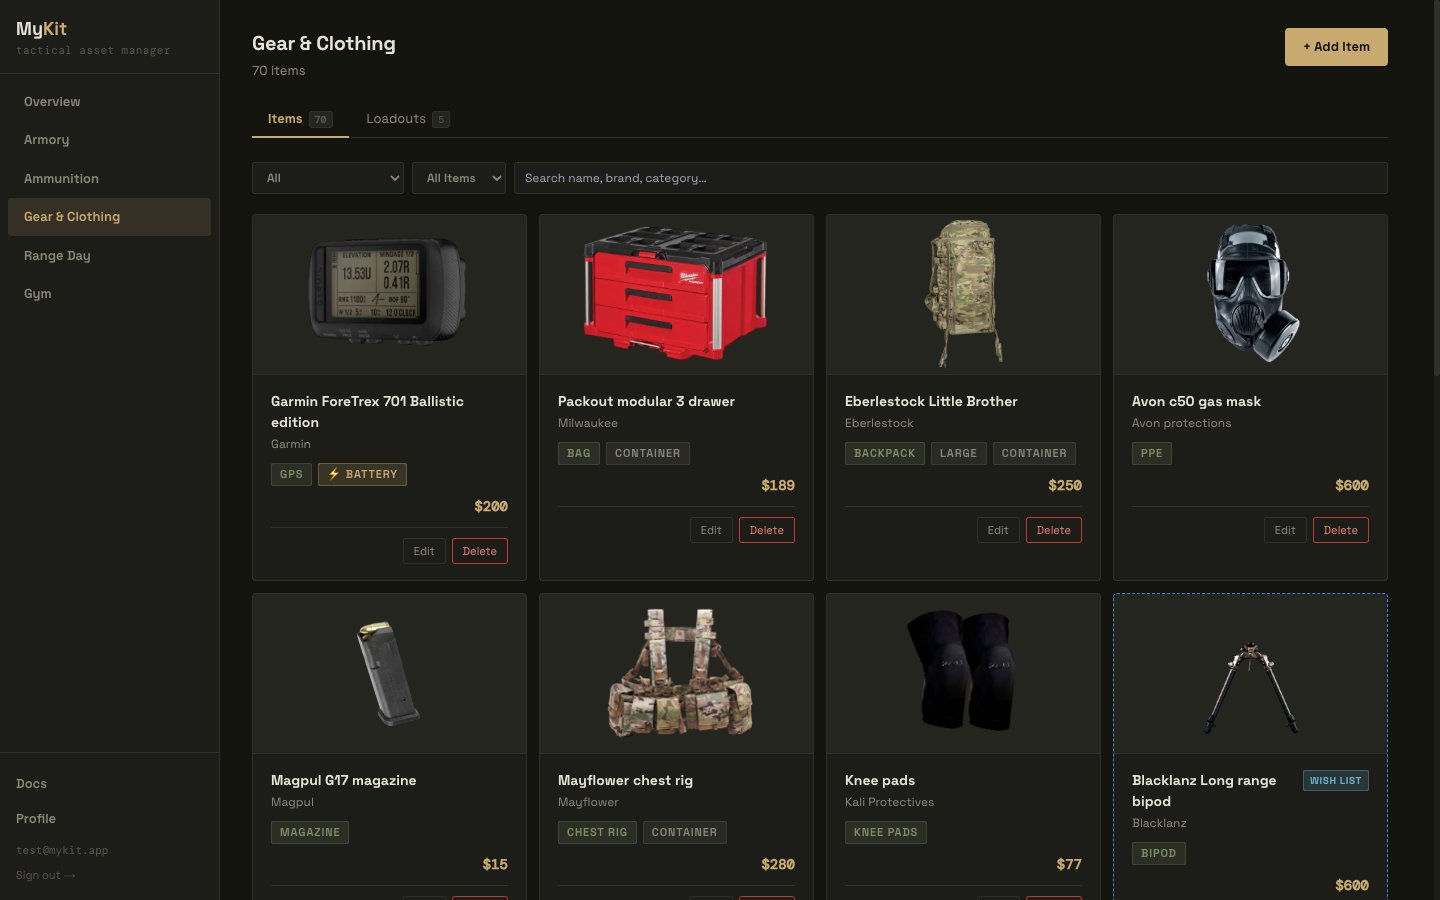
The Items tab is the inventory of individual gear pieces. Each item belongs to your organization and is visible only to your team.
 ### Categories
Items are organized by category. Choose from the built-in list or enter a custom category:
Plate Carrier · Chest Rig · Holster · Belt · Magazine Pouches · Backpack · Bag · Light · Optics · Hearing Protection · Eye Protection · Knife · Medical / IFAK · Pants · Shirt · Jacket · Base Layer · Boots · Gloves · Hat · Other
Select **+ Custom…** at the bottom of the category dropdown to enter a free-text category that isn't in the list.
### Adding an item
1. Navigate to **Gear & Clothing** in the left sidebar.
2. Click **+ Add Item**.
3. Enter the item name and select a category.
4. Fill in brand, size/fit, weight, purchase price, date acquired, and product URL as needed.
5. Configure battery, container, and service status options (see below).
6. Optionally add a photo, notes, and attach documents.
7. Save.
### Battery tracking
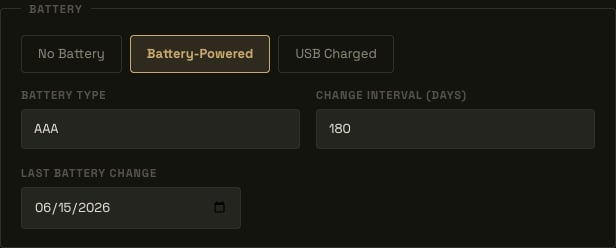
Items that require power can be tracked in one of three modes:
| Mode | When to use | Extra fields |
| --------------- | -------------------------------------- | -------------------------------------------------------------- |
| No Battery | Non-powered items | — |
| Battery-Powered | Disposable batteries (CR123, AA, etc.) | Battery type, change interval (days), last battery change date |
| USB Charged | Rechargeable items | No reminder fields — recharge as needed |
Setting a **change interval** and **last battery change** date on battery-powered items lets the system surface battery change alerts when an item is overdue.
### Categories
Items are organized by category. Choose from the built-in list or enter a custom category:
Plate Carrier · Chest Rig · Holster · Belt · Magazine Pouches · Backpack · Bag · Light · Optics · Hearing Protection · Eye Protection · Knife · Medical / IFAK · Pants · Shirt · Jacket · Base Layer · Boots · Gloves · Hat · Other
Select **+ Custom…** at the bottom of the category dropdown to enter a free-text category that isn't in the list.
### Adding an item
1. Navigate to **Gear & Clothing** in the left sidebar.
2. Click **+ Add Item**.
3. Enter the item name and select a category.
4. Fill in brand, size/fit, weight, purchase price, date acquired, and product URL as needed.
5. Configure battery, container, and service status options (see below).
6. Optionally add a photo, notes, and attach documents.
7. Save.
### Battery tracking
Items that require power can be tracked in one of three modes:
| Mode | When to use | Extra fields |
| --------------- | -------------------------------------- | -------------------------------------------------------------- |
| No Battery | Non-powered items | — |
| Battery-Powered | Disposable batteries (CR123, AA, etc.) | Battery type, change interval (days), last battery change date |
| USB Charged | Rechargeable items | No reminder fields — recharge as needed |
Setting a **change interval** and **last battery change** date on battery-powered items lets the system surface battery change alerts when an item is overdue.
 ### Container flag
Toggle **Is a Container** when adding an item that physically holds other gear — a range bag, plate carrier, chest rig, or pack. Marking an item as a container makes it available as a **nesting target** inside Loadouts (see below).
Items that are not containers cannot have other items placed inside them in a loadout.
### Container flag
Toggle **Is a Container** when adding an item that physically holds other gear — a range bag, plate carrier, chest rig, or pack. Marking an item as a container makes it available as a **nesting target** inside Loadouts (see below).
Items that are not containers cannot have other items placed inside them in a loadout.
 ### In-service status
Each item can be set to **In Service** or **Out of Service**. Choosing Out of Service reveals a **Reason** text field to record why (damaged, sent for repair, retired, etc.). Out-of-service items remain in the list and are still available to add to loadouts, but are visually marked.
### Wish list
Toggle **Wish List** to mark an item as a planned purchase rather than owned inventory. Wish-list items display with a dashed blue border and a **Wish List** badge. Use the wish-list filter on the Items list to show All, Owned only, or Wish List only.
***
## Loadouts tab
A loadout is a named snapshot of the firearms and gear you plan to carry for a specific purpose — a PRS match, a hunting trip, EDC, or a range day. Loadouts pull from your existing Armory and Gear inventories; they do not create copies of items.
### Creating a loadout
1. Go to **Gear & Clothing → Loadouts** tab.
2. Click **+ New Loadout**.
3. Enter a name (e.g. "PRS Match", "Hunting", "EDC") and an optional description.
4. Use the search bar to find firearms and gear by name, brand, or category and add them to the loadout.
5. Configure placement and quantity for each item (see below).
6. Save.
### Item placement
Each item in a loadout has two placement options:
* **Worn on body** — the item is carried directly on the person (a holster on the belt, a plate carrier on the chest).
* **Placed in a container** — the item is packed inside another item in the loadout that is marked as a container.
Toggle the **Worn on Body** switch on any item row to set body-carry placement. To nest an item inside a container, drag it onto the target container row, or use the container selector in the item row.
### Nested containers
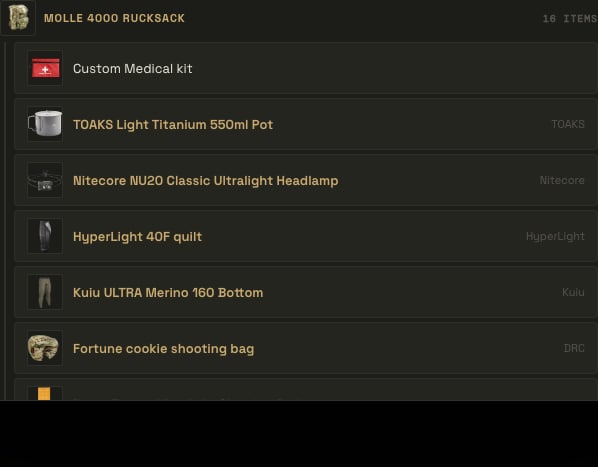
If a loadout includes an item flagged as a container (a range bag, backpack, plate carrier), other items — including other containers — can be placed inside it. This creates a hierarchical packing structure that mirrors how gear is actually organized.
* Items nested inside a container are displayed indented beneath it.
* Removing a container from the loadout detaches all its nested items (they revert to top-level, not deleted).
* Nesting depth is capped to prevent runaway hierarchies.
### In-service status
Each item can be set to **In Service** or **Out of Service**. Choosing Out of Service reveals a **Reason** text field to record why (damaged, sent for repair, retired, etc.). Out-of-service items remain in the list and are still available to add to loadouts, but are visually marked.
### Wish list
Toggle **Wish List** to mark an item as a planned purchase rather than owned inventory. Wish-list items display with a dashed blue border and a **Wish List** badge. Use the wish-list filter on the Items list to show All, Owned only, or Wish List only.
***
## Loadouts tab
A loadout is a named snapshot of the firearms and gear you plan to carry for a specific purpose — a PRS match, a hunting trip, EDC, or a range day. Loadouts pull from your existing Armory and Gear inventories; they do not create copies of items.
### Creating a loadout
1. Go to **Gear & Clothing → Loadouts** tab.
2. Click **+ New Loadout**.
3. Enter a name (e.g. "PRS Match", "Hunting", "EDC") and an optional description.
4. Use the search bar to find firearms and gear by name, brand, or category and add them to the loadout.
5. Configure placement and quantity for each item (see below).
6. Save.
### Item placement
Each item in a loadout has two placement options:
* **Worn on body** — the item is carried directly on the person (a holster on the belt, a plate carrier on the chest).
* **Placed in a container** — the item is packed inside another item in the loadout that is marked as a container.
Toggle the **Worn on Body** switch on any item row to set body-carry placement. To nest an item inside a container, drag it onto the target container row, or use the container selector in the item row.
### Nested containers
If a loadout includes an item flagged as a container (a range bag, backpack, plate carrier), other items — including other containers — can be placed inside it. This creates a hierarchical packing structure that mirrors how gear is actually organized.
* Items nested inside a container are displayed indented beneath it.
* Removing a container from the loadout detaches all its nested items (they revert to top-level, not deleted).
* Nesting depth is capped to prevent runaway hierarchies.
 ### Quantity
Gear items support a **quantity** field for items carried in multiples — magazines, med supplies, patches, etc. Firearms always have a quantity of one.
### Weight summary
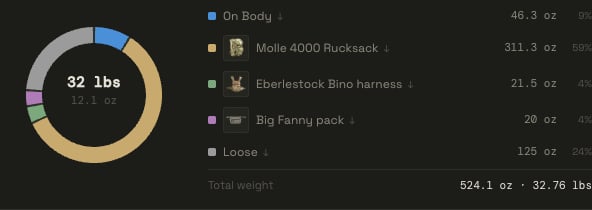
The loadout detail view shows a weight donut chart that breaks down total loadout weight by item. Weight is pulled from the weight field on each firearm and gear item. Items without a recorded weight are excluded from the total.
### Quantity
Gear items support a **quantity** field for items carried in multiples — magazines, med supplies, patches, etc. Firearms always have a quantity of one.
### Weight summary
The loadout detail view shows a weight donut chart that breaks down total loadout weight by item. Weight is pulled from the weight field on each firearm and gear item. Items without a recorded weight are excluded from the total.
 ### Sharing a loadout
Loadouts can be shared publicly via a tokenized link — useful for sharing a kit list with teammates, sponsors, or the broader community without requiring a MyKit.info account.
**To share a loadout:**
1. Open the loadout from the Loadouts list.
2. Click **Share** on the loadout card or detail view.
3. Choose an expiry: **1 week**, **1 month**, or **Never expires**.
4. Click **Create Link** — a unique URL is generated.
5. Copy and share the URL. Recipients can view the full item list without logging in.
### Sharing a loadout
Loadouts can be shared publicly via a tokenized link — useful for sharing a kit list with teammates, sponsors, or the broader community without requiring a MyKit.info account.
**To share a loadout:**
1. Open the loadout from the Loadouts list.
2. Click **Share** on the loadout card or detail view.
3. Choose an expiry: **1 week**, **1 month**, or **Never expires**.
4. Click **Create Link** — a unique URL is generated.
5. Copy and share the URL. Recipients can view the full item list without logging in.
 **Managing active shares:**
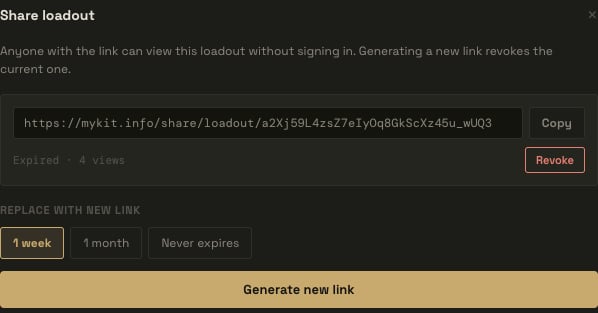
* Active share links are listed in the Share dialog with their expiry date.
* Click **Revoke** to invalidate a link immediately. Previously shared URLs will return a 404 after revocation.
* Only one active share link per loadout is supported at a time. Creating a new link replaces the previous one.
**Managing active shares:**
* Active share links are listed in the Share dialog with their expiry date.
* Click **Revoke** to invalidate a link immediately. Previously shared URLs will return a 404 after revocation.
* Only one active share link per loadout is supported at a time. Creating a new link replaces the previous one.