Overview
Range Day ties your Armory, Gear, and Ammunition data together into training records. It has four tabs: Sessions, Drills, Competitions, and Performance.Sessions tab
The Sessions tab is the default view. It lists all logged range sessions in reverse-chronological order. Upcoming sessions appear on the main dashboard.Logging a session
- Navigate to Range Day in the left sidebar.
- Click + Session.
- Fill in the date, start time, duration (minutes), and location.
- Add one or more firearms to the session, each with a round count and optional ammo lot.
- Optionally select a loadout used for the session.
- Add any session notes and save.
Firearms and ammo
Each session supports multiple firearm rows. For each firearm you can:- Select the firearm from your Armory.
- Enter the number of rounds fired.
- Select the ammo lot used — the dropdown is automatically filtered to calibers compatible with the selected firearm.
Google Calendar export
On any saved session card, click the Cal button to open a pre-filled Google Calendar event. The event includes the session date, time, location, firearms, round counts, and loadout details — useful for scheduling future sessions or keeping a training log outside the app.Drills tab
Drills are reusable templates that define a course of fire. You run a drill, log the result, and track improvement over time on the Performance tab.Creating a drill
- Go to Range Day → Drills tab.
- Click + Drill.
- Enter a name (e.g. “Bill Drill”, “El Presidente”) and select a discipline.
- Choose a drill mode and scoring method.
- Build out the steps.
- Save.
Drill modes
| Mode | Description |
|---|---|
| PAR Timer | A fixed time limit — the goal is to complete the drill before the beep. Set a par time in seconds. |
| Shot Count | Fire a set number of shots and record the elapsed time. Optionally set a target time. |
Scoring methods
| Method | When to use |
|---|---|
| Time | Fastest clean run wins. Requires a time entry on each result. |
| Percentage | Score as a percentage of a perfect run (e.g. USPSA-style). |
| Hits | Total hits on target (e.g. steel plates). |
| Score | Calculated point total. |
Multi-step drill builder
Drills are built from an ordered list of steps. Each step has an action type:- Shoot — fire at a target. Set the yard line and shot count. The total round count for the drill is automatically calculated from all Shoot steps.
- Move To — move to a position. Enter the destination (e.g. “3 yard line”, “cover position”).
- Action — any other task (e.g. “Reload”, “Draw from holster”, “Make safe”).
- Yard line — distance to the target in yards.
- Par time — a per-step time limit in seconds (optional, supplements the overall par).
- Points possible — max points for this step (used with Score or Percentage methods).
- Notes — e.g. “strong-hand only”, “no sights”.
Competitions tab
The Competitions tab tracks formal matches — USPSA, IDPA, PRS, and others.Competition types
USPSA · IDPA · 3-Gun · PRS · NRL · Steel Challenge · OtherAdding a match
- Go to Range Day → Competitions tab.
- Click + Add Match.
- Fill in the match name, competition type, division, and optionally a classifier number.
- Set the date, start time, and location.
- Select a loadout — this auto-populates the firearms list with the firearms in that loadout.
- Add or adjust firearm rows with rounds fired and ammo lots used.
- Optionally expand the Results section and enter your scores.
- Add after-action notes and save.
Results fields
| Field | Notes |
|---|---|
| Overall Place | Finish position across all competitors |
| Division Place | Finish position within your division |
| Total Points | Raw point total |
| Hit Factor | Points per second (USPSA-style) |
After-action notes
The competition form has two separate note fields:- Notes — general session observations.
- After-Action — lessons learned, things to work on, or tactical takeaways. Kept separate so it’s easier to review post-match analysis independently.
Performance tab
The Performance tab is where you log individual drill results and review your progress over time.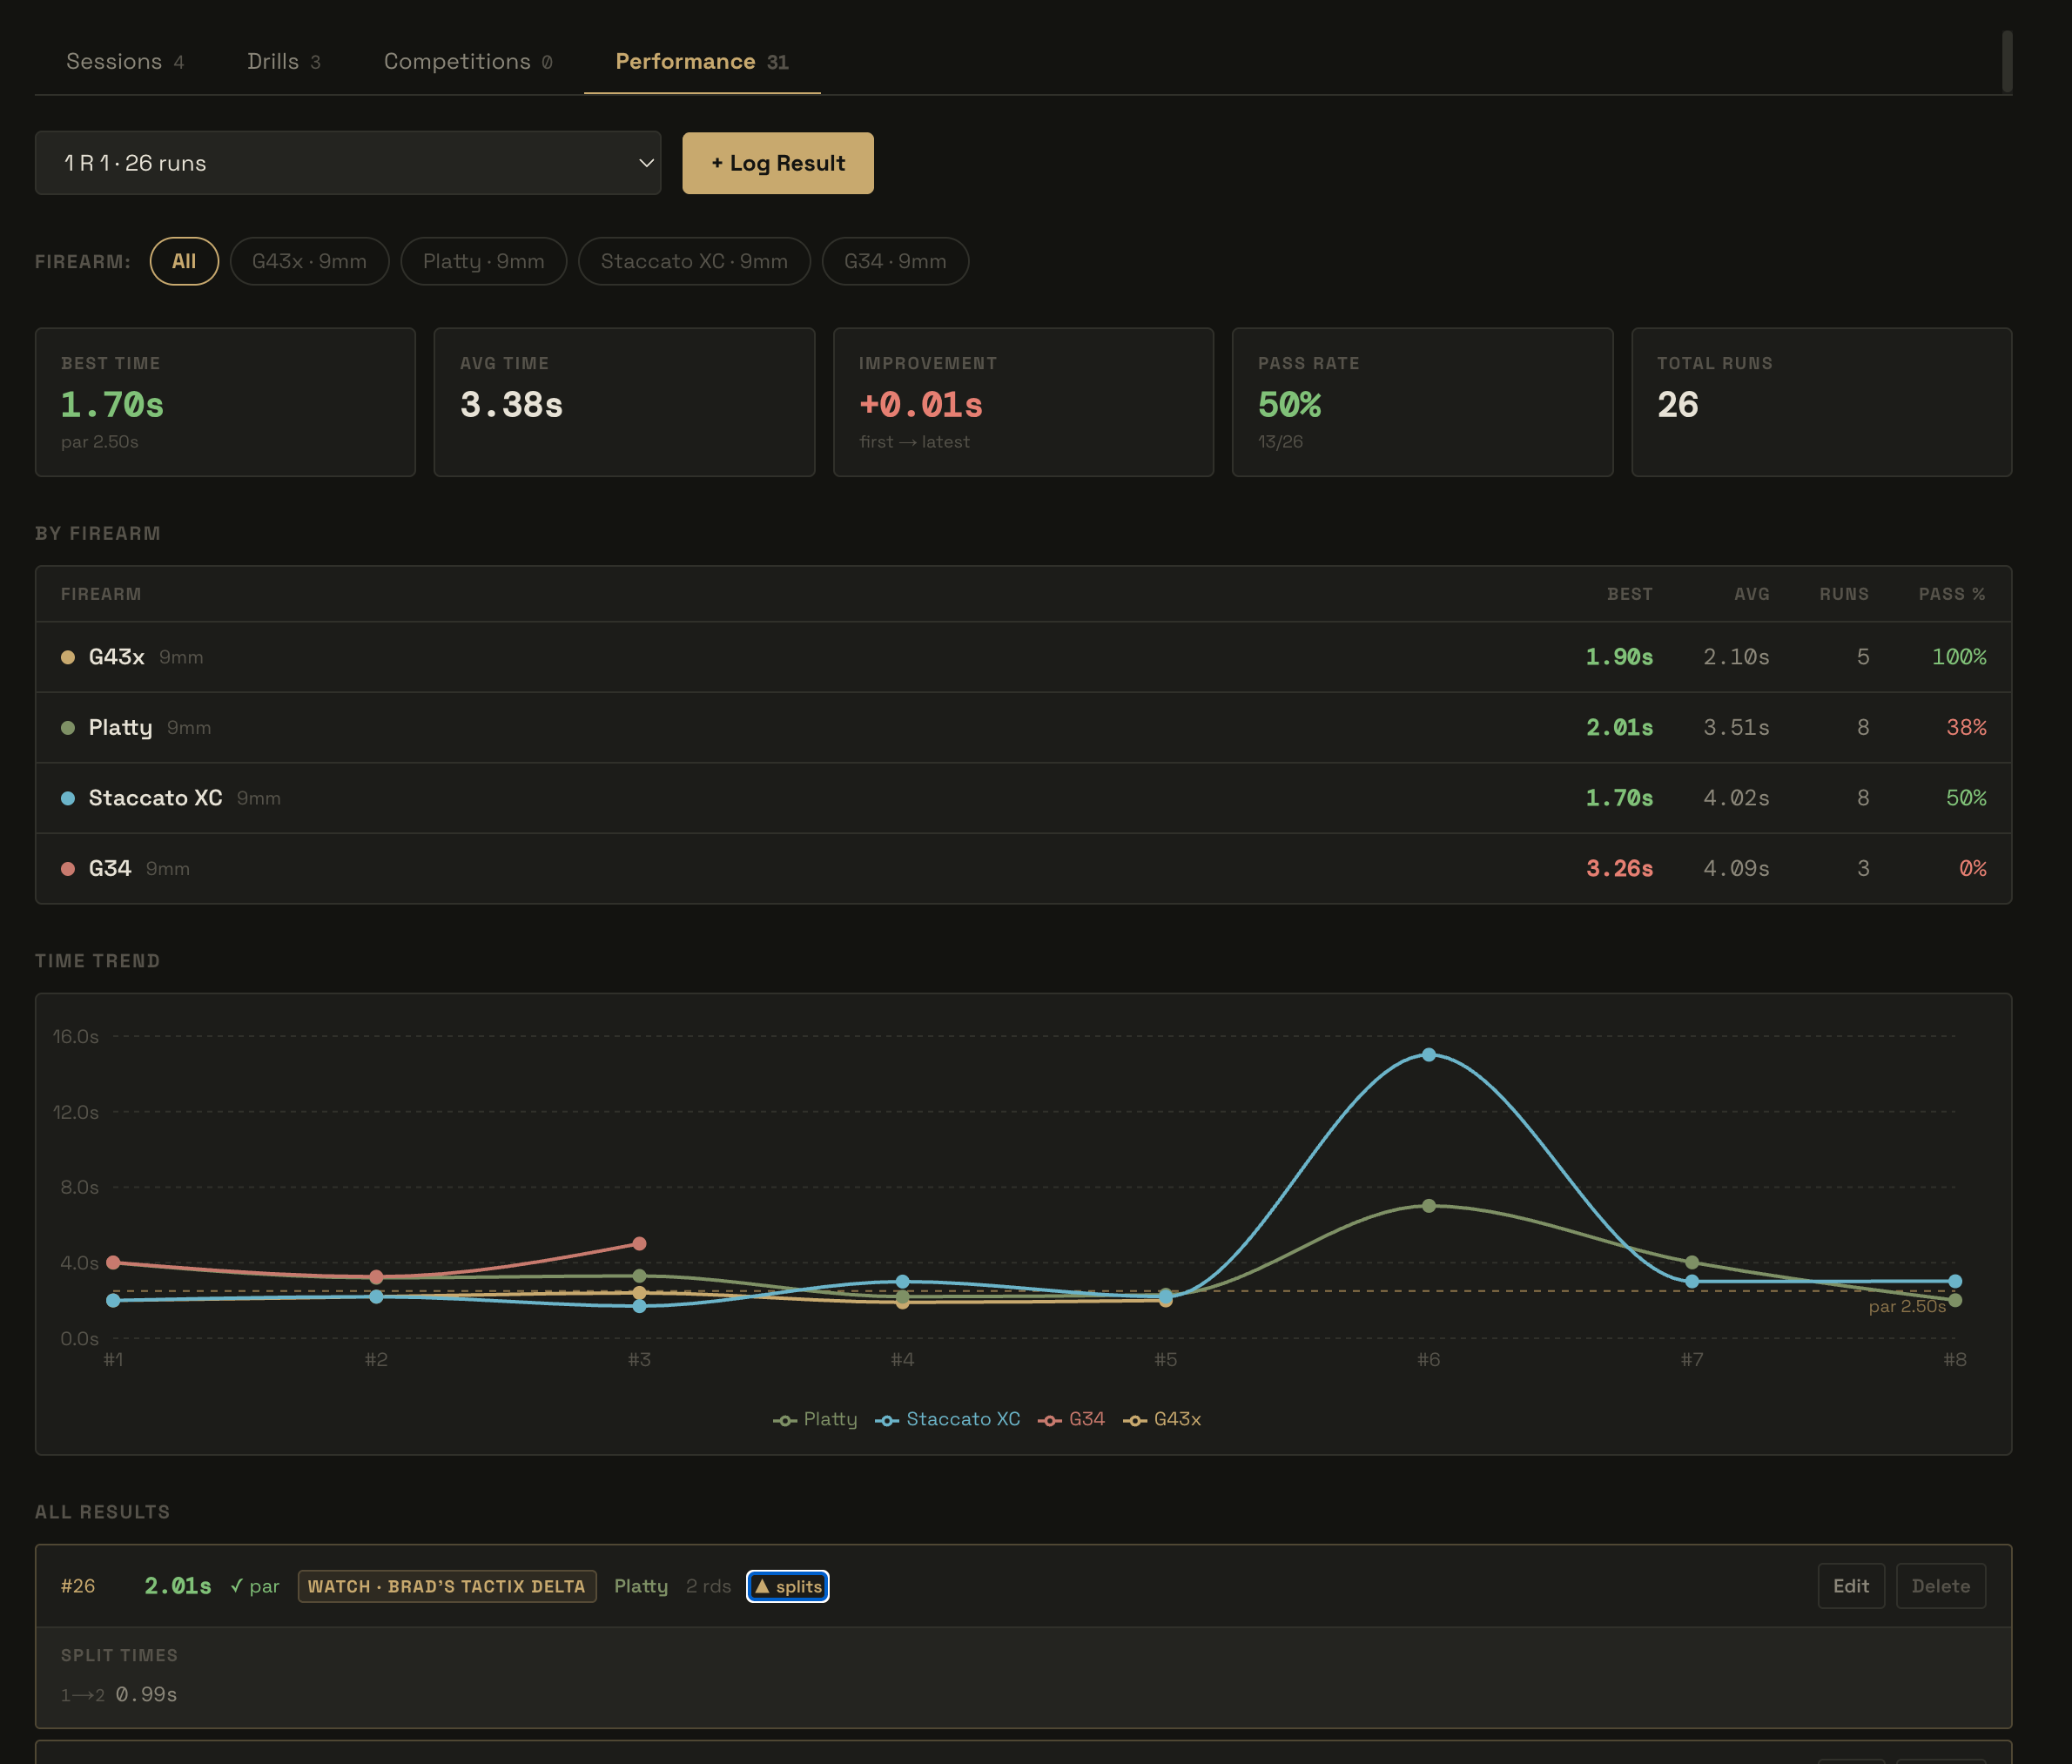
Logging a result
- Go to Range Day → Performance tab.
- Click + Log Result.
- Select the drill and optionally the firearm used.
- Enter the result fields based on the drill’s scoring method:
| Scoring method | Fields shown |
|---|---|
| Time | Time (seconds) — required |
| Percentage | Time (optional) + Score (%) |
| Hits | Hits count |
| Score | Time (optional) + Score (points) |
- Enter round count and any notes.
- Save.
Performance chart
The Performance tab plots your results for each drill over time. You can compare runs across different firearms and loadouts to see how equipment changes affect performance.Integration hooks
Results can also be submitted automatically through hardware integrations:- Watch Integration — send a drill to a paired Garmin watch. The watch tracks the run and submits the result back to the Performance tab automatically. See Watch Integration.
- Shot Timer Integration — connect a Shooter Global Shot Timer via Bluetooth. Start a drill from the app, run it on the timer, and the result is captured and graphed automatically. See Shot Timer Integration.
Integrations
Watch Integration
Send drills to a Garmin Tactix Delta and receive shot-detected results automatically.
SG Shot Timer Integration
Connect a Shooter Global Shot Timer via Bluetooth to capture and graph drill results.